How do I Control the MTS-5000 and MTS-5100 Wirelessly?
Why Wireless?
Manta’s MTS-5100 Protective Relay Testing System and the earlier MTS-5000 are optimized for ease of operation using the front panel controls. For most of your testing, you don’t need a PC or any kind of communications link.
There are some reasons to connect a PC to the test system, though, including:
- Controlling the test system using Manta’s Remote Console software or Doble RTS™ (RTS) software
- Moving files between the test system and a computer
- Re-running tests using Manta’s RapidReporter™ software.
For those tasks, you can wire your PC to the test system using an Ethernet crossover cable, but that’s not your only option. A number of our users have asked us how they can connect wirelessly, to eliminate the cable connection.
Selecting a Suitable Router
The Manta test system does not currently have built-in Wi-Fi, but you can easily add that capability using a low-cost travel router. You can also use an ordinary desktop Wi-Fi router or access point, but most people find those cumbersome to transport and connect in a normal substation environment.
For a “low cost” solution, I looked for the absolute cheapest travel router that meets our requirements, namely:
- Small enough to easily tuck into a bag or case along with other equipment.
- USB-powered to avoid hunting around for a power connection.
- Secure from hacking, using modern WPA encryption.
- Readily available worldwide.
A colleague has been working with the TP-LINK TL-WR702N, which appears to be the cheapest product that meets those requirements. It is readily available for purchase from Amazon for around twenty dollars.
There are other suitable routers, but I wanted to be able to give a specific example. Manta is not affiliated with TP-LINK in any way, and my suggestion to use the TP-WR702N is strictly based on personal experience.
Configuring the Router
The router comes with everything you need, an AC adapter, a flat Ethernet cable, a USB cable and the router itself.
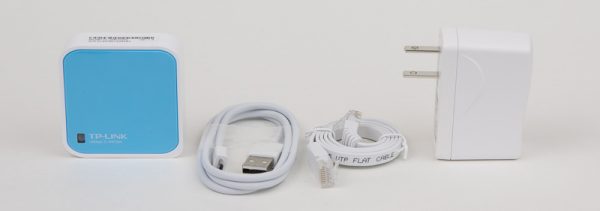
It also includes a quick start guide and a resource CD.
The only reason you’d need the AC adapter is if you’re using both USB ports on your MTS-5100 or MTS-5000 for something else like a keyboard and mouse. In that case, a USB port will not be available to power the router, so you’ll need to find an AC outlet and plug in the adapter. The USB cable is only used to power the router, not for data.
Before you use the router for the first time, you may need to configure it. You only need to do this step once, if at all. After completing the configuration, just plug in the router and use it.
There are instructions on the TP-LINK website, saying you need to connect the router to a PC using a wired LAN (http://www.tp-link.com/en/FAQ-642.html). That’s not entirely true. I powered up one of the routers, fresh from the sealed box, and didn’t have to set anything up.
Right out of the box, Wi-Fi is enabled, and so is DHCP in the latest versions of router firmware. Security looks like it’s set up nicely, using highly-secure WPA-PSK/WPA2-PSK, and the unique PSK password is printed on a label right on the router. Take a close look at the label. You can just about figure out the password from the SSID. The SSID appears on your PC or mobile device when you are in range, so we recommend changing the password for added security.

There is a great deal of information about the router on the TP-LINK website (www.tp-link.com) and of course the quick start guide covers the basics. The basic idea, though, is:
- Using your PC or mobile device’s Wi-Fi settings, connect to the SSID that starts with “TPLINK”, or connect your PC to the Ethernet port on the router. The quick start guide says to use Ethernet, but I found using Wi-Fi for this step worked well.
- Point your web browser to tplinklogin.net (192.168.0.254 normally works as well), which is the setup address for the router.
- Log in — the username and password are both “admin”, all lower case.
- Adjust the settings.
- You want the router to use “AP Mode”, which is the default. You also need the built-in DHCP server to be enabled, which is also the default.
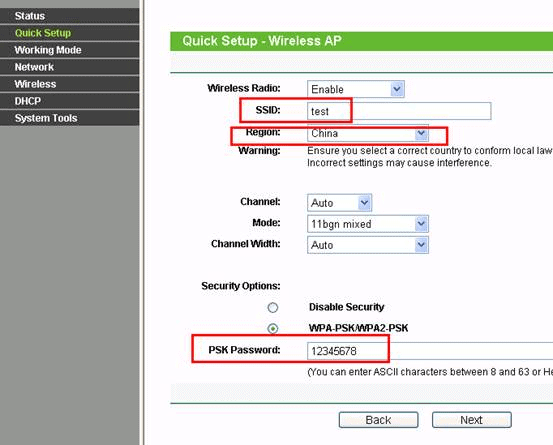
You can change the SSID and the PSK password on the “Quick Setup” page. You should use a fairly long password, to make sure you have a secure connection.
TP-Link also recommends that you check the router’s region, to configure it for the specific Wi-Fi regulations in your country. The one I received was already set to “United States”, which is appropriate for Canada. You can also change the SSID if you like, so that the router appears with a different name when you connect to it.
Now that the router is configured, we can hook it up to a test set and try it out.
Using the Router
The first step is to plug it in. You can use the cables that came with the router or different cables if you prefer. The LAN/WAN jack on the router connects to the Ethernet port on the MTS-5100 using an Ethernet cable. The power connector on the router connects to a free USB port on the test system. As I mentioned earlier, if you don’t have a free USB port you can use an AC adapter instead.
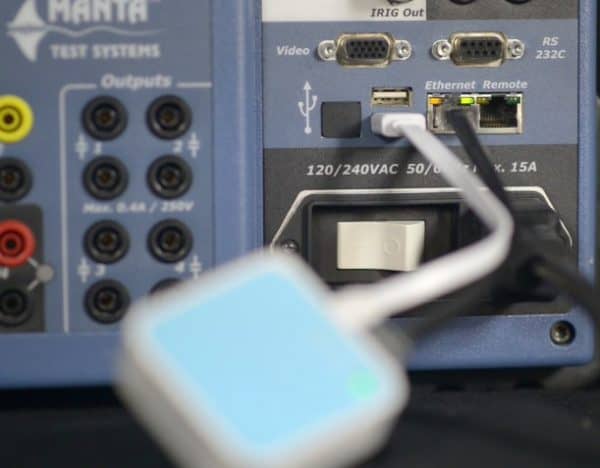
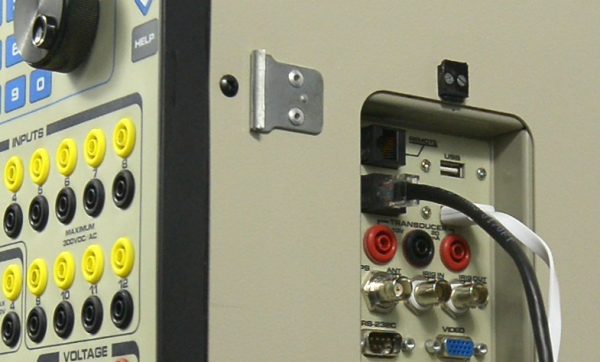
The procedure is exactly the same for the older MTS-5000 Protective Relay Testing System. Plug in the USB and Ethernet cables, and you’re all set. The router will power up when you turn on the test system.
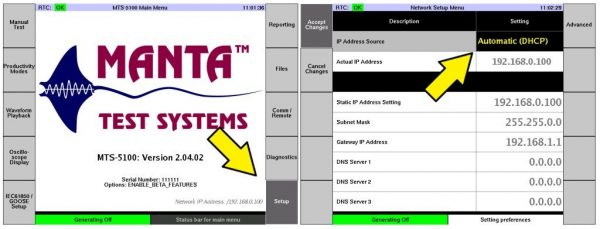
Now you need to set the networking parameters on the test system. To get to the network configuration screen, from the main menu press F10 “Setup,” then F5 “Set Up Network.” Set the IP Address Source setting to “Automatic,” then press F1 “Accept Changes.” Turn the test set off and back on again, to make sure that setting takes effect.
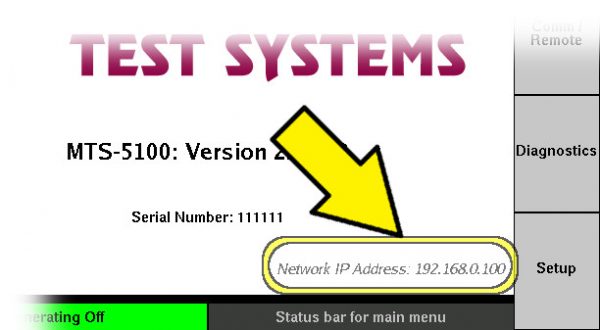
Your test system’s IP address will appear near the lower right corner of the screen. That’s the address you’ll use on your PC or mobile device to access the test system.
Now you can connect to the test system over Wi-Fi with a phone, tablet or PC.
Connecting a Windows PC
Setting Up the Connection
If you’re controlling the Manta test system wirelessly, you’ll most likely use a Windows laptop PC. For this procedure to work, your laptop needs to have Wi-Fi capability, either built in or using a USB or similar adapter.
If you’ve set up Wi-Fi connections to connect your laptop with a home or office internet connection, the procedure for connecting to the MTS-5100 is the same.
in Windows 10:
- In the Settings menu, select “Network & Internet.”
- Select “Wi-Fi” and “show available networks.”
- Select the wireless network from the list. If you haven’t changed the SSID in the router, it is the one starting with “TP-LINK.”
- Click “Connect.” If it prompts you for a password, enter the password from the back of your router, or if you reconfigured it, enter the password you created.
In Windows 8 or 8.1:
- Click the Settings (gear) icon.
- Click the Wireless icon.
- Select the wireless network from the list. If you haven’t changed the SSID in the router, it is the one starting with “TP-LINK.”
- Click “Connect”. If it prompts you for a password, enter the password from the back of your router, or if you reconfigured it, the password you set.
In Windows 7:
- In the Start menu, run “Connect to a network.”
- Thereafter the procedure is the same as for Windows 8.
Using the Connection
Once you’re connected, you can use the Wi-Fi connection to do the same things you would do using an Ethernet crossover cable. That includes the web interface, which has options for downloading reports, taking screen captures and various other operations.
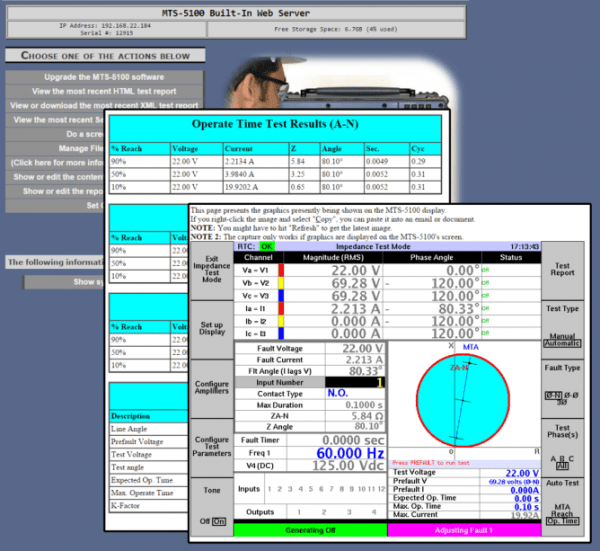
To transfer files between your PC and the test system you can use FTP. One way to do that is to use Windows Explorer. Hold down the “Window” key and press E to launch Explorer, or select “Computer” from the Start Menu. In the address bar at the top, enter your test system’s IP address in the following format: ftp://[email protected]. The “IP.OF.TEST.SYSTEM” part is the IP address that appears in the lower-right corner of the main menu on the MTS-5100.

If it prompts you for a password, it’s “mts5000,” all lower case, with no dash. You’ll want to check the “Save password” checkbox, so you don’t need to enter the password in future.
You can drag and drop files between that Explorer window and your Windows folders or desktop.
Manta provides several programs through our user forum. The programs are included with the purchase of your MTS-5000 or MTS-5100, so you can download them for free if you’re registered in our customer area.
RapidReporter™ lets you fetch XML report data from the test system and manage it in a database. You can print the reports using custom report templates, and you can export them back to the test set. Every report file includes the settings that were used for the tests, so you can load them back on the test system and re-run the test. There’s also a specific “re-run” feature, so RapidReporter can send the settings to the test set, retrieve the resulting test report, and keep everything organized for you.
You can also download and install MTS-5×00 Remote Console program, which lets you control the test system from your PC. It uses the same menus and screens as the test set, so everything works just like it does on the front panel. One thing to watch for with Remote Console is that it uses a lot of bandwidth. That’s normally not a problem, but if it’s disconnecting or performing poorly on a Wi-Fi connection, you might need to move closer to the test set.
There are some other programs available in the customer area, but RapidReporter and MTS-5×00 Remote Console are the ones most commonly used.
In addition to Manta software, Doble RTS automated testing software also works just fine on a Wi-Fi link. Many utilities have standardized on RTS for relay testing.
Connecting a Mobile Device (Smartphone or Tablet)
Setting Up the Connection
Whether your phone or tablet runs Google Android, Apple IOS or some other mobile operating system, the procedure for connecting is similar:
- Get to the Wi-Fi settings page.
- Select the router’s SSID from the list.
- The first time you connect, enter the password and tell the phone to remember that password.
The specifics vary depending on the specific version of Android, IOS, etc. In Android, you generally start by swiping down from the top of the screen, and in IOS you normally run the Settings app. In either case you can then go to your Wi-Fi settings and pick the router’s SSID.
Using the Connection
Manta doesn’t provide Android or IOS apps to go with our test systems, although we’ll certainly do that if there’s enough demand. There are several things you can do just using a web browser, though.
In the web browser, enter the IP address of the test system. That’s the one in the lower-right corner of the test set’s screen, in the earlier example. Now you can see a web page that’s served by the MTS-5100 or MTS-5000.
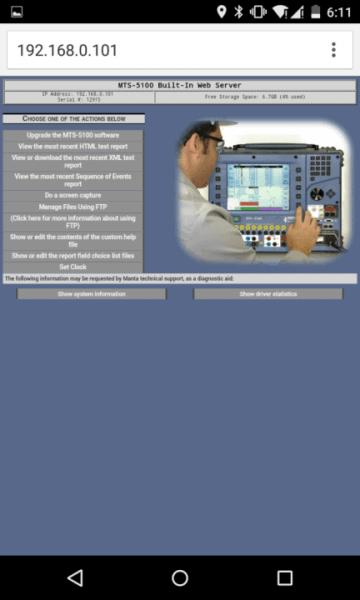
At the top you have some information about the test system:
- The model number;
- IP address;
- Serial number;
- And the amount of free storage in its internal flash memory.
There are several options down the left side and at the bottom. The options at the bottom are useful when you need to send information to customer support for troubleshooting. If you need to use a phone to send those pages to customer support, you can touch the option for the page you want, then select the entire page. Copy it to the clipboard, and paste it into an email.
Depending on your browser, you can also do a long press of the option and select “Save image.” That works on the Chrome browser in an Android phone, for example.
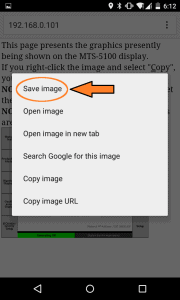
Now you can go to the “Downloads” app and send the file as an attachment.
Alternatively, I’ve found that the “Skitch” app from Evernote works well. There’s a tutorial on the Evernote website: evernote.com/skitch/guide/android. You can share a web page to Skitch, then crop and annotate it. From Skitch, you can share it to GMail, Dropbox, etc., to send the image to a colleague. Skitch creates an email with a cropped, annotated image attached. Here’s an example:
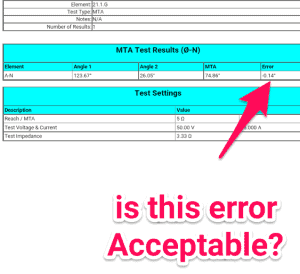
Whenever you send information over the internet, you’ll need to disconnect from the test system’s Wi-Fi SSID and either enable mobile data or connect to a different Wi-Fi router. As long as you’re connected to the test system, you will not have internet access. In general, then, the steps to take are:
- Connect to the test system’s SSID.
- Gather the data you need, saving it to your phone or pasting it into one or more emails. When you send an email, it will sit in your outbox waiting for an internet connection.
- Connect to your mobile or Wi-Fi internet service.
- Wait for your email account to synchronize, so that your emails are sent.
The same method works for test reports and Sequence of Events reports. You can right click the second, third or fourth option in the menu, and save an HTML test report, and XML report or an HTML Sequence of Events report. That way you can email test reports to somebody back at the office, and that kind of thing.
Sometimes you need to send someone an image of what’s on the screen. You can do that using the “Do a screen capture” option. Just make sure you save the image, then send the saved image. If you share the image URL, the person you’re sending to won’t be able to access the image, because they’re not on your network.
The “Manage files using FTP” option lets you get files from the test system. On most phones, it will pop up a list of files that you can download. If you have an FTP app installed, you may also be able to send files to the test set.
For More Information
We have prepared a YouTube video on this subject, which you can find at youtu.be/41_ijHJPmvA or using the embedded player below:
